


This post may contain affiliate links to products I use and highly recommend. You can read my full disclosure . As an Amazon Associate I earn from qualifying purchases.
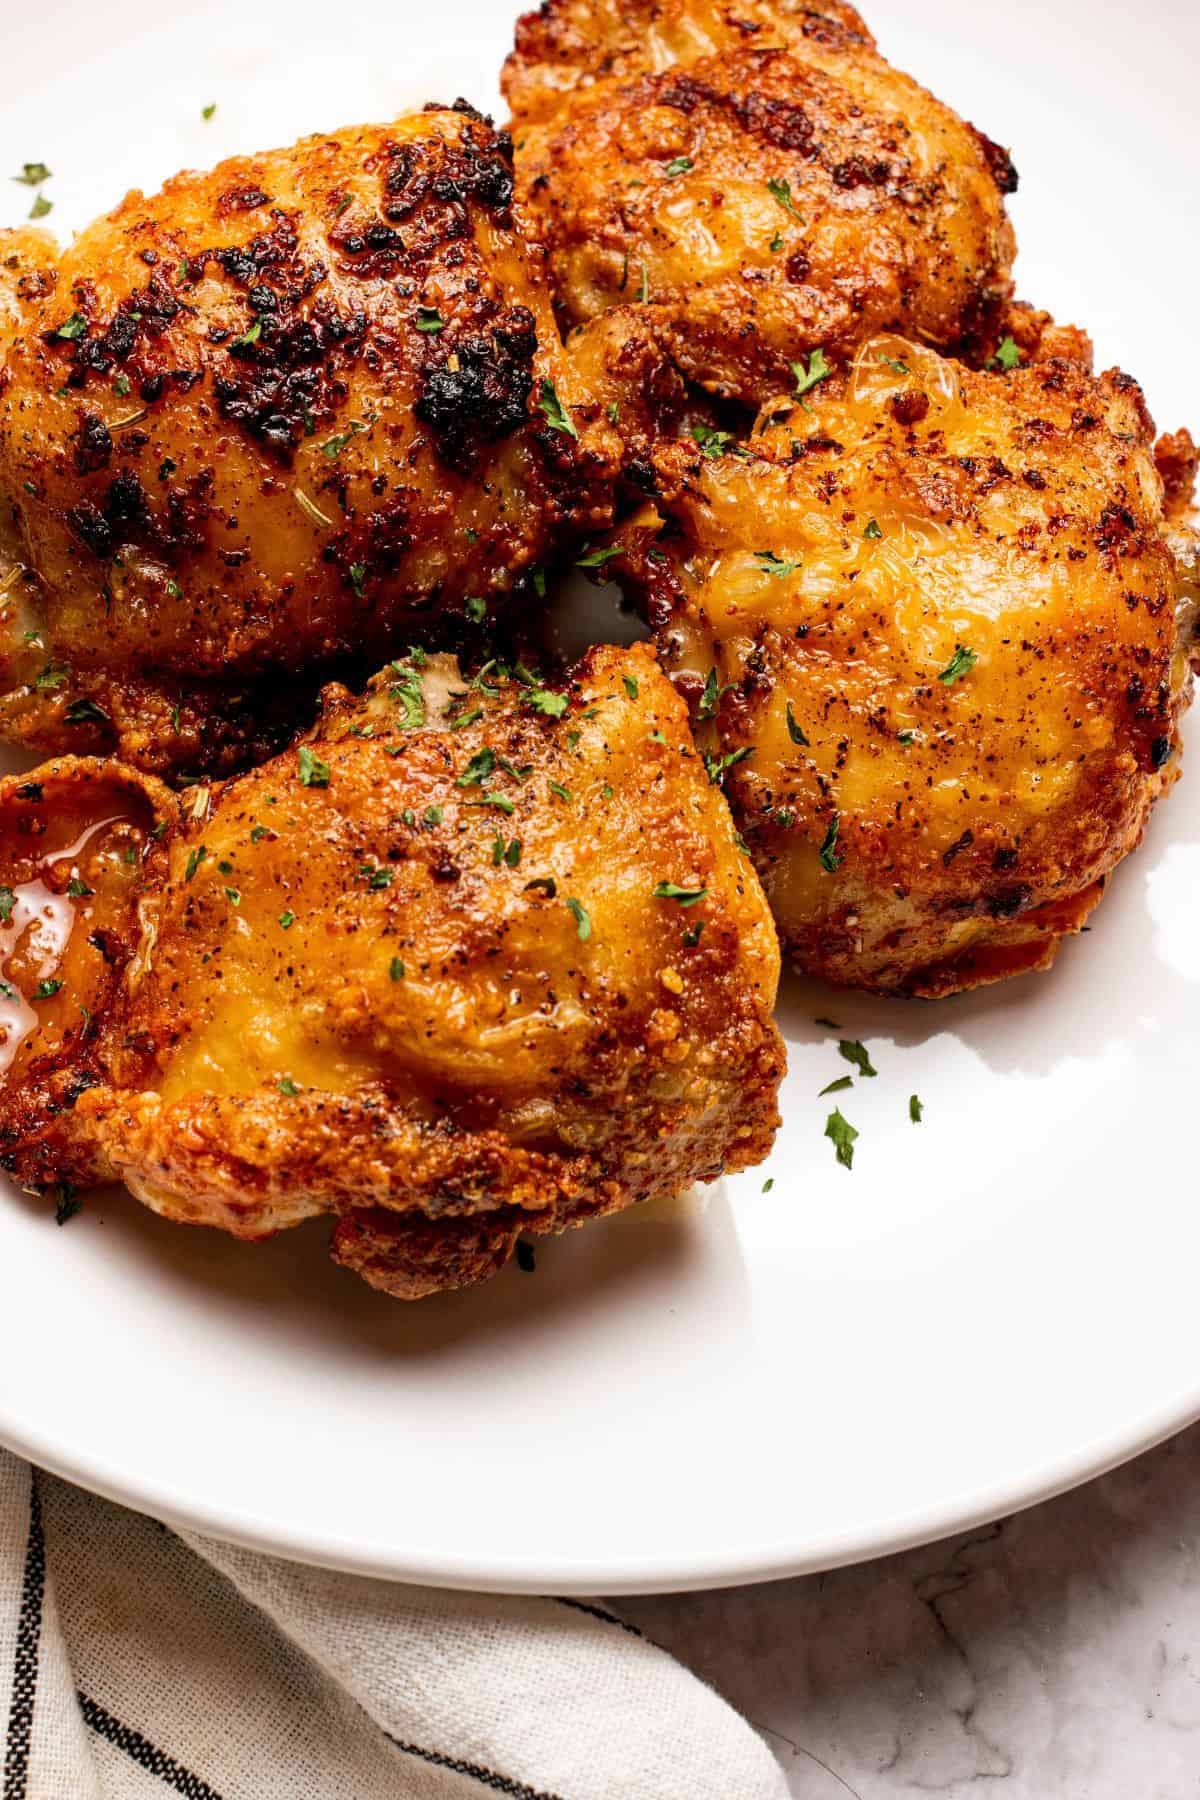
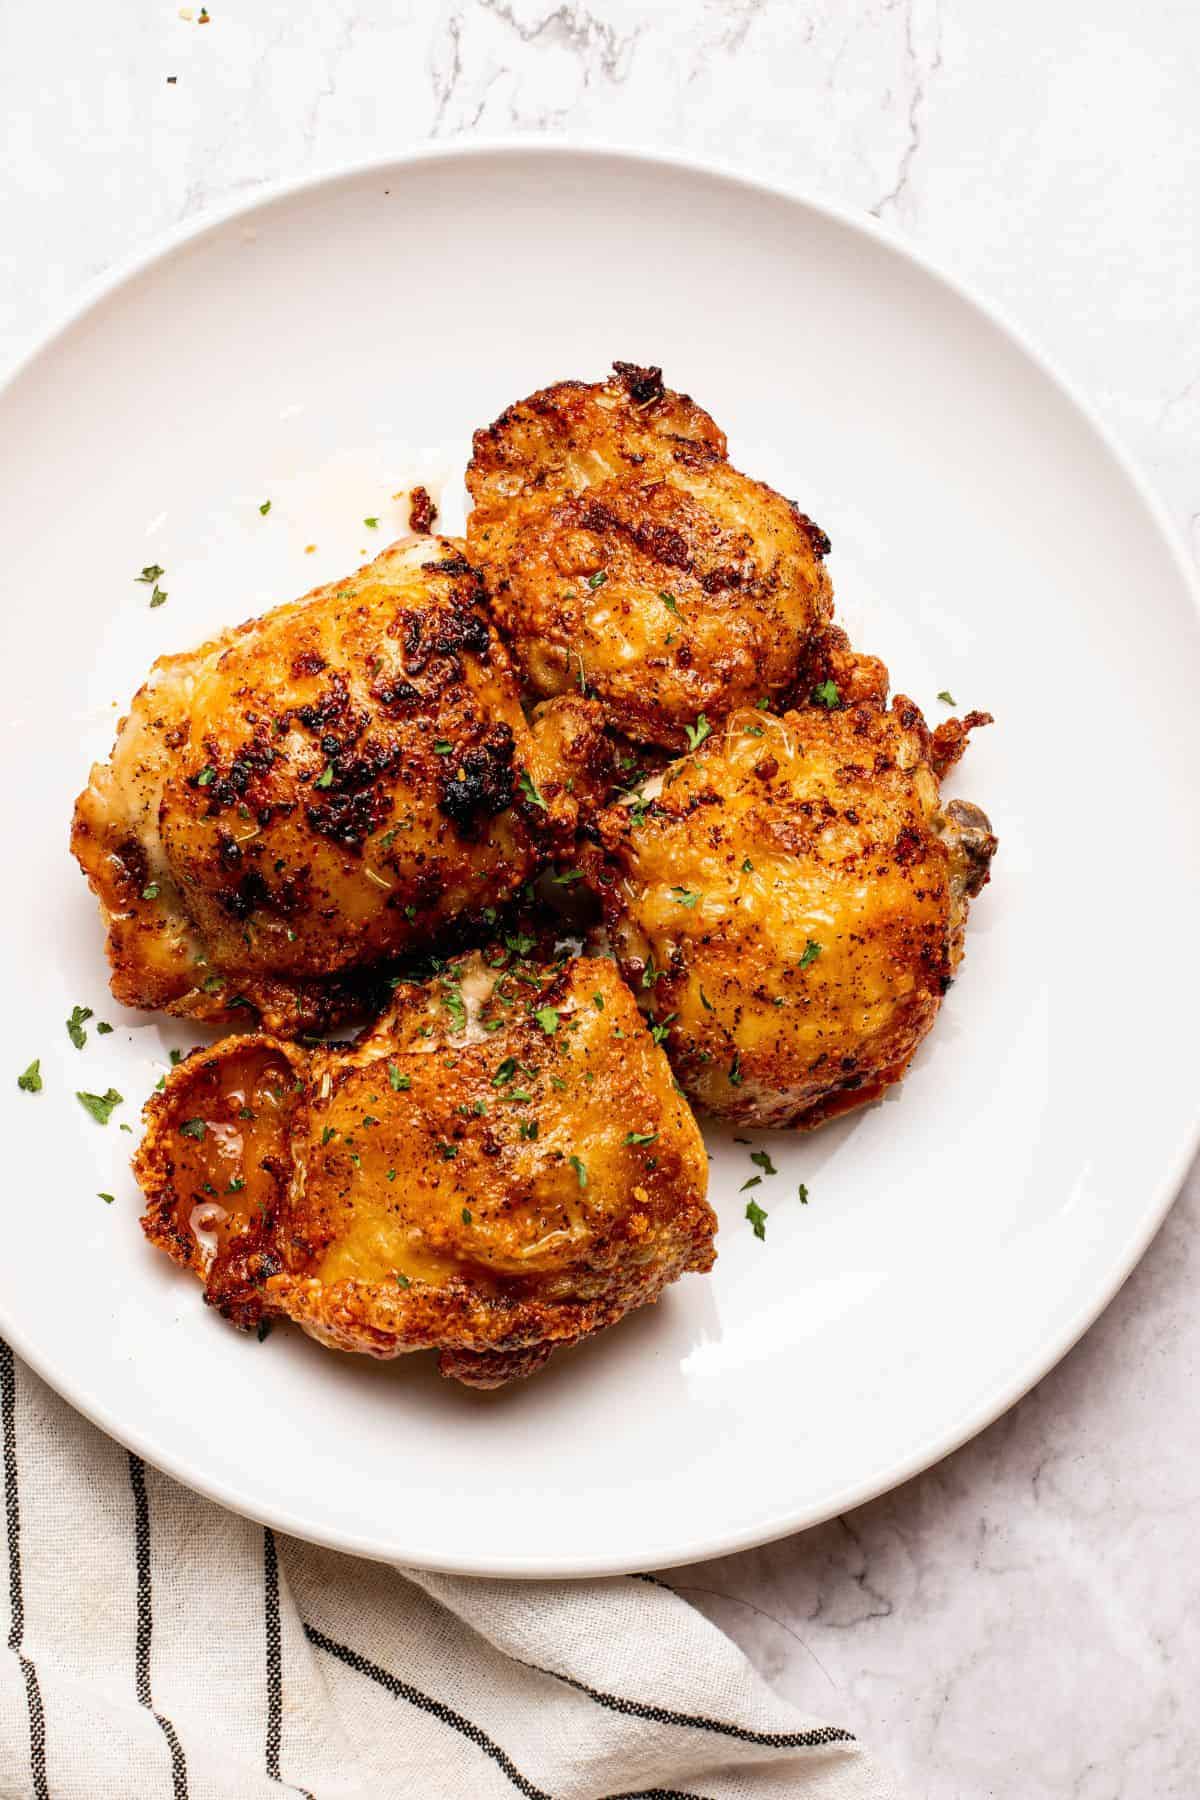
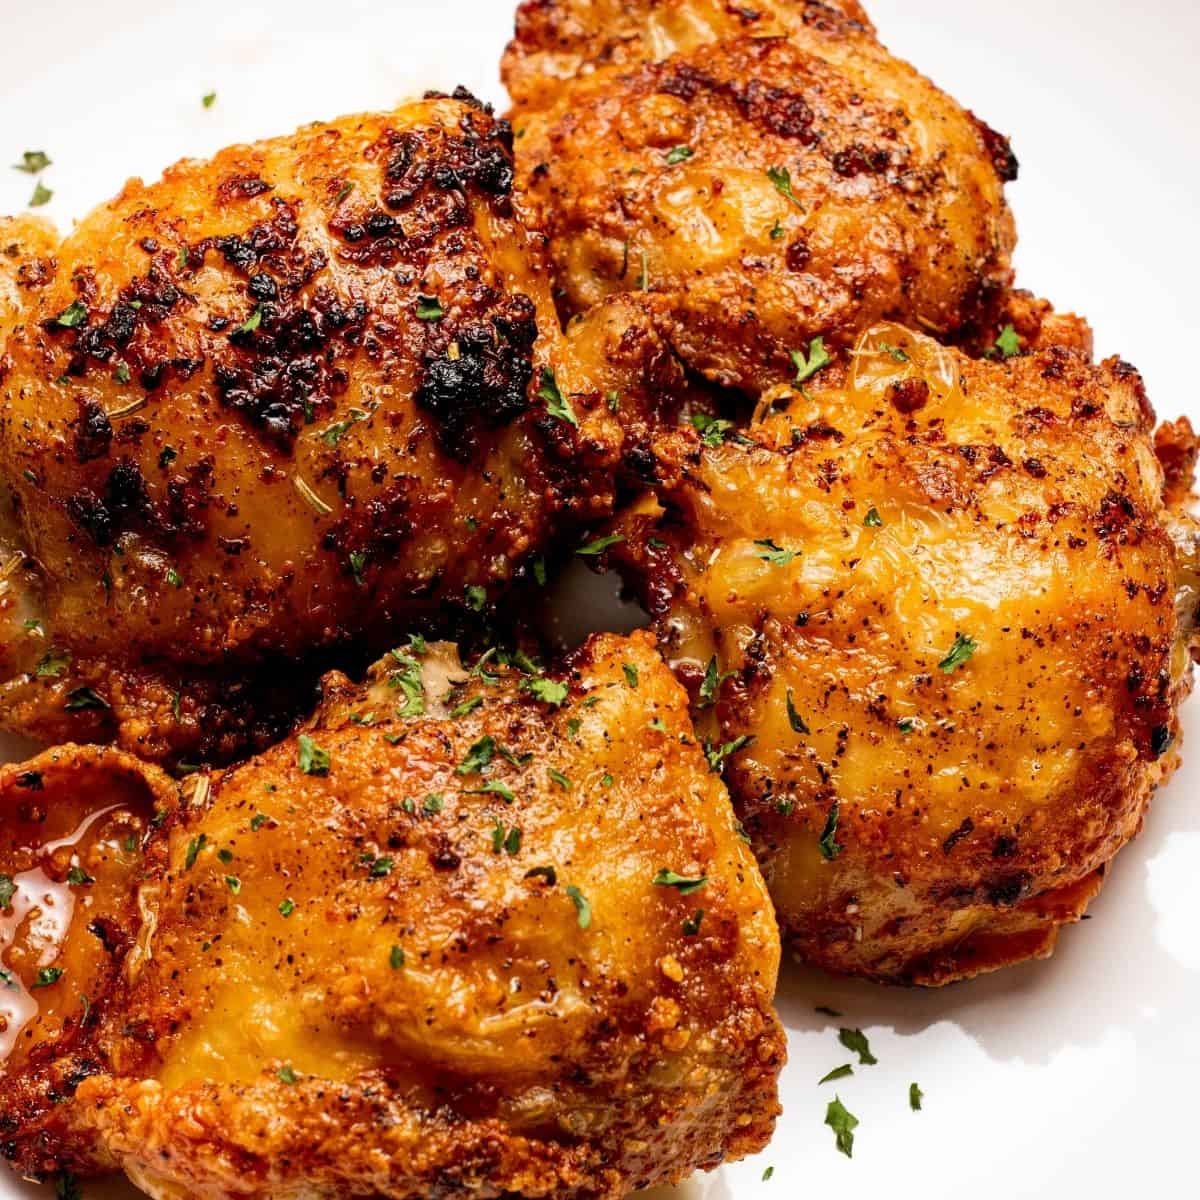
These Air Fryer Chicken Thighs (bone-in, skin-on) deliver big flavor with minimal effort. Using just six simple ingredients, including my homemade garlic butter, you cook tender, juicy chicken with irresistibly crispy skin. Ready in under 30 minutes, this recipe puts a flavorful spin on my classic air fryer chicken thighs and keeps dinner fast and easy on busy weeknights.
Why You’ll Love This Recipe
Here’s why this recipe keeps making its way back to our dinner table:
- Only 6 simple ingredients: including pantry basics like salt and pepper, so it’s easy to pull together any night of the week.
- Perfectly crispy, buttery chicken: the air fryer crisps the skin while the chicken cooks in rich homemade garlic butter, keeping it juicy and flavorful.
- Ready in under 30 minutes: a fast, satisfying meal that fits right into busy schedules.
Ingredients You’ll Need
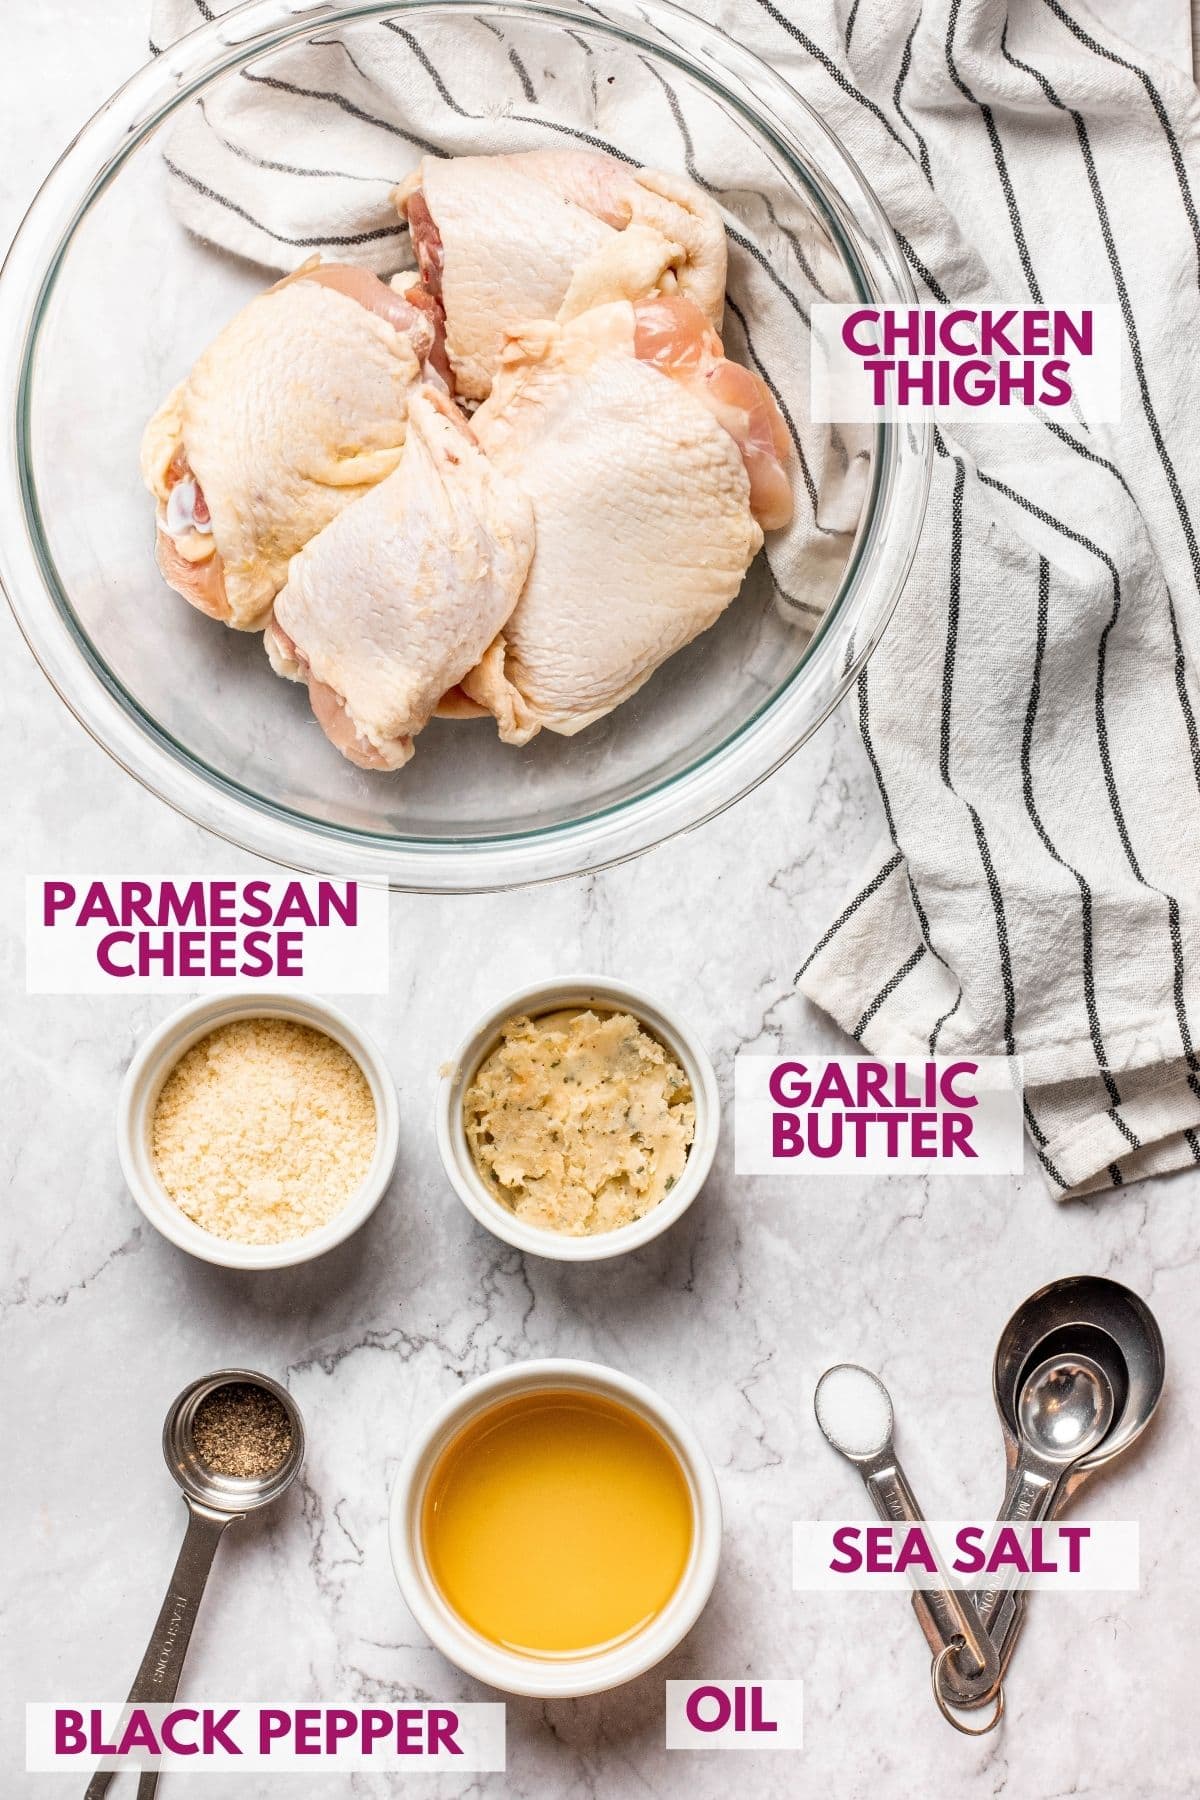
This quick list highlights what you’ll need to make air fryer bone-in chicken thighs turn out juicy, flavorful, and perfectly crisp every time.
Be sure to grab the exact measurements from the recipe card at the bottom of the post.
- Chicken thighs (bone-in, skin-on): The bone keeps the meat juicy while the skin crisps up beautifully in the air fryer. This cut delivers the best flavor and texture for this recipe.
- Sea salt: Enhances the natural flavor of the chicken and helps draw moisture to the surface for better browning.
- Black pepper
- Garlic butter: I use my homemade garlic butter for the richest flavor. Making a batch ahead of time makes this recipe even faster and works well on veggies, seafood, and bread, too.
- Grated Parmesan cheese (refrigerated section): Freshly grated Parmesan melts smoothly and adds a savory, salty finish that complements the garlic butter without overpowering the chicken.
- Oil: sometimes, I add 1 tbsp of oil to help the seasoning stick to the chicken thighs. It’s completely optional since the garlic butter helps with this too.
How to Make Bone-in Chicken Thighs in the Air Fryer
Making this air fryer bone-in chicken thighs recipe is easy. Use this step-by-step photo as a guide to learn how to make it in a few key steps:
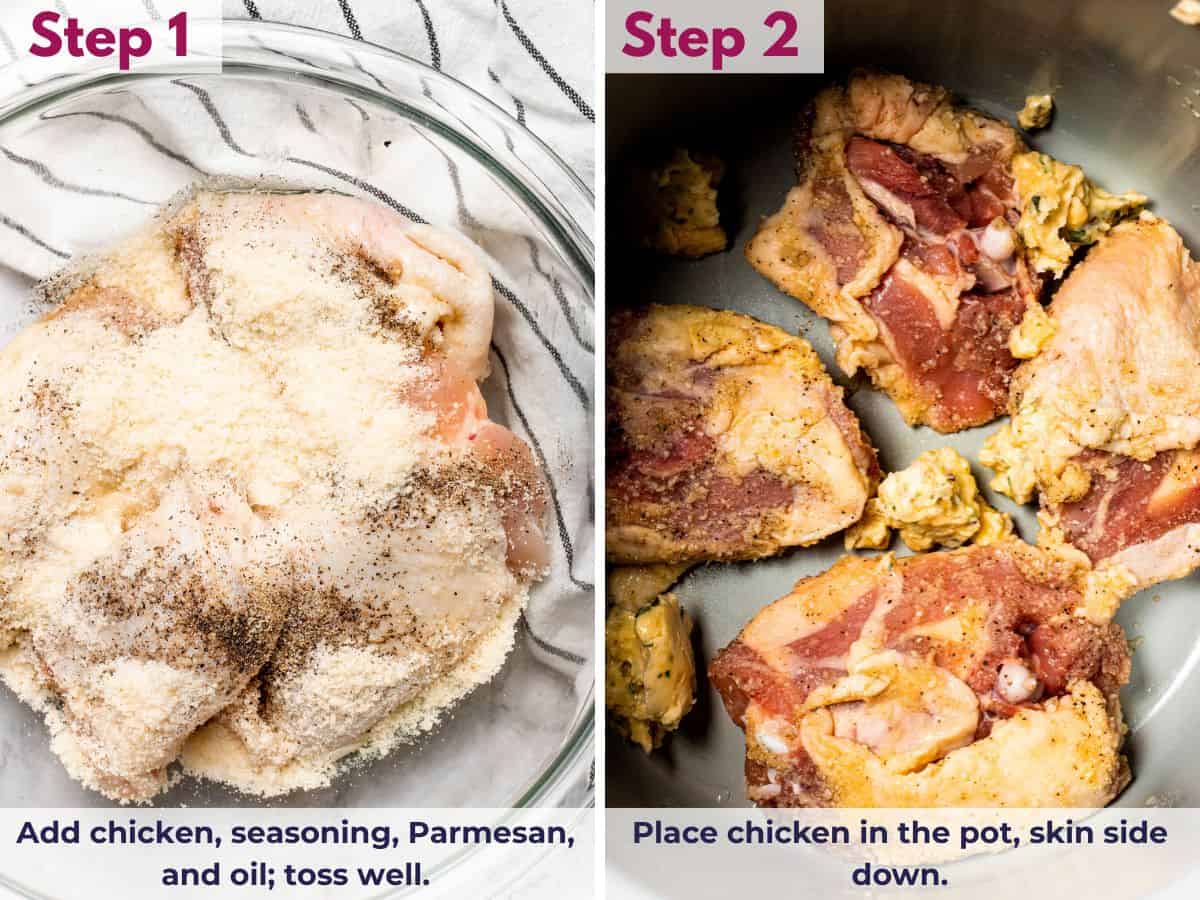
Season & prep the chicken
Pat the chicken dry, then toss it in a bowl with the seasoning and Parmesan until evenly coated.
Arrange the chicken skin-side down in the air fryer pot and top each piece with garlic butter to infuse flavor as it cooks.
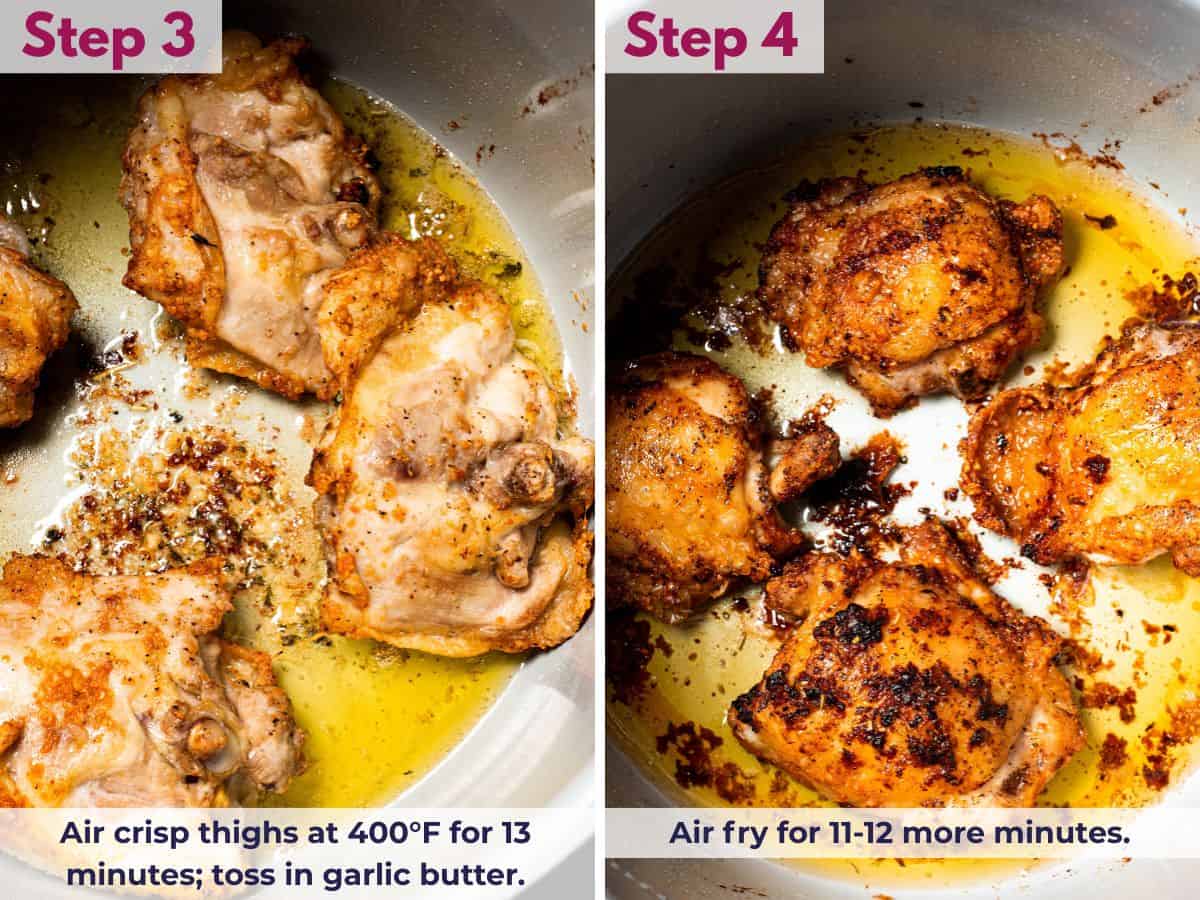
Air fry, toss, and finish
Air crisp the thighs until the butter melts, then use tongs to coat the chicken on all sides. Flip the thighs skin-side up and continue air frying until the skin turns golden and crispy.
Finish with a sprinkle of fresh herbs like parsley, green onions, or chives for a bright, flavorful touch.
SAVE THIS RECIPE
Other Tool Options
I love that you can also cook these bone-in chicken thighs in the oven, but the air fryer is my favorite: it makes the skin incredibly crispy while keeping the meat juicy.
If you’d like to try the oven method, check out my baked bone-in chicken thighs guide for timing and temperature tips.
Pro Tips That Save Time & Add Flavor
A few simple tips can help you get juicy, flavorful chicken with perfectly crispy skin:
- Garlic butter matters: I tested this recipe with my easy homemade garlic butter, which adds just the right amount of richness and salt. If you’re using a store-bought version with an unknown salt level, you can hold the salt in the seasoning and taste the chicken after cooking to avoid it being too salty.
- Season well: Toss the chicken with the seasoning and Parmesan until evenly coated before cooking. This ensures every bite is flavorful.
- Start skin-side down: Placing the chicken skin-side down lets the garlic butter melt over the meat as it cooks, keeping it juicy while beginning to crisp the skin.
- No special air fryer? No problem: If your air fryer doesn’t have a cooking pot like a Ninja Foodi, use a cake pan accessory. Just place the seasoned chicken thighs in the pan and cook as usual. I’ve also made this with a small piece of foil as an air fryer basket liner.
- Even browning tip: Avoid crowding the chicken so the air circulates freely. This helps the skin crisp evenly and the meat cook perfectly.
Swaps & Variations
All of my recipes are kitchen-tested and designed to adapt to real life. Here are some easy swaps and tweaks to personalize this dish:
- Protein swaps: while bone-in chicken thighs give the juiciest results, you can also use skin-on chicken drumsticks or even boneless thighs. Just adjust the cooking time slightly for smaller pieces.
- Veggie options: roast your favorite vegetables alongside the chicken. Broccoli, green beans, or bell peppers work well and can be cooked in the air fryer or oven at the same time.
- More flavor: you can switch up the butter using some of my other garlic butter recipes like Lemon Garlic Butter Sauce and Cajun Garlic Butter Sauce Recipe
More Air Fryer Bone-in Chicken Thighs Recipes
If you love these Ninja air fryer bone-in chicken thighs, then you will also love these other bone-in, skin-on chicken thigh recipes:
FAQs
For this recipe, I cook the chicken thighs at 400°F. Start skin-side down for part of the cooking time, then flip and finish skin-side up. The thighs usually take about 24–25 minutes total, and they’re ready when the skin is golden and crispy and the internal temperature reaches 165°F. This method keeps the meat juicy while giving you that irresistible crispy skin every time.
Storage & Reheating
- Store: Keep leftover chicken in an airtight container in the fridge for up to 3 days.
- Freeze: I don’t recommend freezing this recipe, as the skin won’t stay crispy after thawing.
- Reheat: Warm in the air fryer at 375°F for 3–5 minutes until heated through.
Printable Recipe Card
Air Fryer Chicken Thighs (Bone In)
Use DRDAVINAHS at checkout to save on some equipment & ingredients!
Recommended Equipment
Ingredients
- 1 lb Chicken Thighs, bone-in and skin-on
- ¼ tsp Natural Ancient Sea Salt
- 1/2 tsp Black Pepper
- 1 tbsp Grated Parmesan Cheese, from the refrigerated section of the grocery store
- 4 tbsp garlic butter, click for recipe
Instructions
- Pat the chicken dry with a paper towel. Then, add it to a large bowl.
- Season the chicken: add the seasoning and Parmesan to the bowl with the chicken. Toss it with the chicken to evenly coat it.
- Add the chicken to the bottom of the cooking pot (no air fryer insert needed), skin side down. Top the chicken with the garlic butter.
- Air fry the chicken thighs at 400 °F for 13 minutes.
- Use tongs to toss the chicken in the melted garlic butter and coat both sides.
- Air fry at 400 °F skin side up for 11-12 more minutes until the chicken thigh skin is crisp.
- Optional: top with parsley, sliced green onions, or chives.
SAVE THIS RECIPE
Recipe Notes
- Garlic butter matters: I tested this recipe with my easy homemade garlic butter, which adds just the right amount of richness and salt. If you’re using a store-bought version with an unknown salt level, you can hold the salt in the seasoning and taste the chicken after cooking to avoid it being too salty.
- Season well: Toss the chicken with the seasoning and Parmesan until evenly coated before cooking. This ensures every bite is flavorful.
- Start skin-side down: Placing the chicken skin-side down lets the garlic butter melt over the meat as it cooks, keeping it juicy while beginning to crisp the skin.
- No special air fryer? No problem: If your air fryer doesn’t have a cooking pot like a Ninja Foodi, use a cake pan accessory. Just place the seasoned chicken thighs in the pan and cook as usual. I’ve also made this with a small piece of foil as an air fryer basket liner.
- Even browning tip: Avoid crowding the chicken so the air circulates freely. This helps the skin crisp evenly and the meat cook perfectly.
Nutrition Details
The nutrition facts come from entering the recipe ingredients into a database of food ingredients. They may vary for any recipe based on the exact product used.


Leave a Reply